Add TA652FH-W to ThingsBoard
Tip
- This section applies to the situation where you add TA652FH-W to ThingsBoard Server.
- If you are adding the first Avantec HVAC device to ThingsBoard Server, please refer to Get Started.
Step 1. Tenant Login
- Open ThingsBoard Web UI in browser, e.g. http://localhost:8080
- Tenant Administrator login ThingsBoard.

Tenant default username and password, refer to Some important parameters.
Step 2. Import Device Profile of TA652FH-W
Tip
A Device Profile file can only be imported once. If you have already imported it, you do not need and cannot repeat the import.
If you have already imported it, you can skip this step.
- Download
ta652fh_w_thermostat.json. - Profiles –> Device profiles –> + –> Popup dialog: Import device profile –> Drag and drop my device profile File –> Import.


Step 3. Import Dashboards of TA652FH-W
Step 3.1 Import Detail Dashboard
Tip
A Dashboard file can only be imported once. If you have already imported it, you do not need and cannot repeat the import.
If you have already imported it, you can skip this step.
- Download
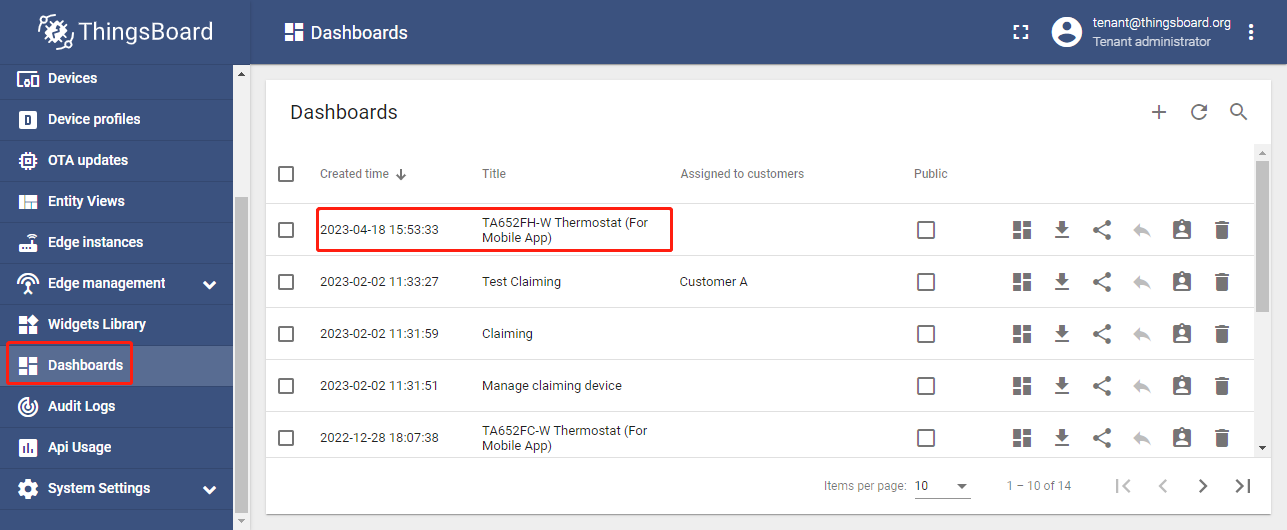
ta652fh_w_thermostat__for_mobile_app_.json. - Dashboards –> + –> Popup dialog: Import dashboard –> Drag and drop detail dashboard File –> Import.


Step 3.2 Modify Device Profile - Mobile dashboards
- Profiles –> Device profiles –> click my device profile –> Toggle edit mode (red icon)

- Modify Mobile dashboard –> Apply changes (red icon)

These values are shown in the following table:
| Field | Value |
|---|---|
| Mobile dashboard | TA652FH-W Thermostat (For Mobile App) |
Step 3.3 Import List Dashboard
Tip
A Dashboard file can only be imported once. If you have already imported it, you do not need and cannot repeat the import.
If you have already imported it, you can skip this step.
- Download
ta652fh_w_thermostat_list.json. - Dashboards –> + –> Popup dialog: Import dashboard –> Drag and drop list dashboard File –> Import.


Step 3.4 Modify List Dashboard - Action Target dashboard
- Dashboards –> Click my list dashboard

- Edit (red icon on the bottom and right)

- Enter Edit Dashboard Mode –> Edit Widget (icon)

- Action –> Edit Action (icon)

- Modify Target dashboard –> modify Target dashboard state –> Save

These values are shown in the following table:
| Field | Value |
|---|---|
| Target dashboard | TA652FH-W Thermostat (For Mobile App) |
| Target dashboard state | monitor |
- Apply changes (red icon)

- Apply changes (red icon on the bottom and right)

Step 4. Provision TA652FH-W device
Step 4.1 Add device
- Devices –> + –> Add new device –> Popup Dialog –> Input Name, Label & Description, select device profile –> Add.

| Field | Value |
|---|---|
| Name* | My device name, e.g. TA652FH-W-TB, A8:48:FA:57:D5:20 |
| Device profile* | TA652FH-W Thermostat |
| Label | My device label, e.g. Avantec Manufacturing Plant |
| Description | My device description, e.g. A Thermostat for floor-heating |
Note
The field with * must be filled in.
- Now my device should be listed first, since the table sort devices using the time of the creation by default.

Step 5. Connect TA652FH-W device
Step 5.1 Copy credentials of new device
To connect the device you need to get the device credentials first. ThingsBoard supports various device credentials. We recommend using default auto-generated credentials which is access token for this guide.
- Devices –> Manage credentials (icon) –> Popup Dialog –> Select Access Token,
Ctrl + C.

Tip
The Credentials (Access Token), which you need to use when you’re configuring your hardware, for example, j9JiCkID9E7uE1WhKxnc, lMTQLZ7VSRQSD7ls.
Step 5.2 Connect device to ThingsBoard
Step 5.3 Publish data to ThingsBoard
Now your device has already published telemetry data to ThingsBoard. You should immediately see them in the Device Telemetry Tab:

Step 6. Assign Device and Dashboards to Customer
One of the most important ThingsBoard features is the ability to assign Dashboards to Customers. You may assign different devices to different customers. Then, you may create a Dashboard(s) and assign it to multiple customers. Each customer user will see his own devices and will not be able to see devices or any other data that belongs to a different customer.
Refer to Step 7.1 Create customers, Step 7.4 Create customer user & Step 7.5 Activate customer user.
Step 6.1 Assign dashboards of TA652FH-W to Customer
- Assign Detail dashboard to Customer: Dashboards –> Click Manage assigned customers (icon) in Detail dashboard line –> Popup Dialog –> Select My New Customer –> Update.

- Assign List dashboard to Customer: Dashboards –> Click Manage assigned customers (icon) in List dashboard line –> Popup Dialog –> Select My New Customer –> Update.

- It’s like this now.

Step 6.2 Assign TA652FH-W device to Customer
- Devices –> Click Assign to customers (icon) in My New Device line –> Popup Dialog –> Select My New Customer –> Assign.

- It’s like this now.

Step 7. Open Dashboards of TA652FH-W
- You are logged in as a Customer User or a Tenant user.
- Dashboards –> click my list dashboard

- Select my device –> Settings (icon)

- Switch page –> Operation


