Add TA65 to ThingsBoard
Add devices (TA65 thermostat) to ThingsBoard.
Tip
Two devices are added in this section, TA65-FC-TB and TA65-FH-TB. You may add only one device, such as TA65-FC-TB.
Step 1. Login
- Open your ThingsBoard website in your browser.
- Tenant Administrator login ThingsBoard: tenant@thingsboard.org / tenant.

The default user name and password are shown in the following table:
| Field | Value |
|---|---|
| Username | tenant@thingsboard.org |
| Password | tenant |
Step 2. Add device
Devices –> + –> Add new deivce –> Popup Dialog –> Input –> Add.


| Field | Device A | Device B |
|---|---|---|
| Name* | TA65-FC-TB | TA65-FH-TB |
| Device type* | TA65-FC-TB | TA65-FH-TB |
| Label | AVANTEC Headquaters | Avantec Manufacturing Plant |
| Description | A Thermostat for fan-coil | A Thermostat for floor-heating |
Note
The field with * must be filled in.
Step 3. Copy credentials of new device
Devices –> Manage credentials (icon) –> Popup Dialog –> Copy Access Token –> Select Access Token –> Ctrl + C.

Tip
The Credentials (Access Token), which you need to use when you’re configuring your hardware, for example, j9JiCkID9E7uE1WhKxnc, lMTQLZ7VSRQSD7ls.
Step 4. Add shared attributes of new device
Devices –> New device(TA65-FC-TB or TA65-FH-TB) –> Attributes –> Shared attributes –> + –> Popup Dialog –> Inpug Key, Value type & value –> Add。
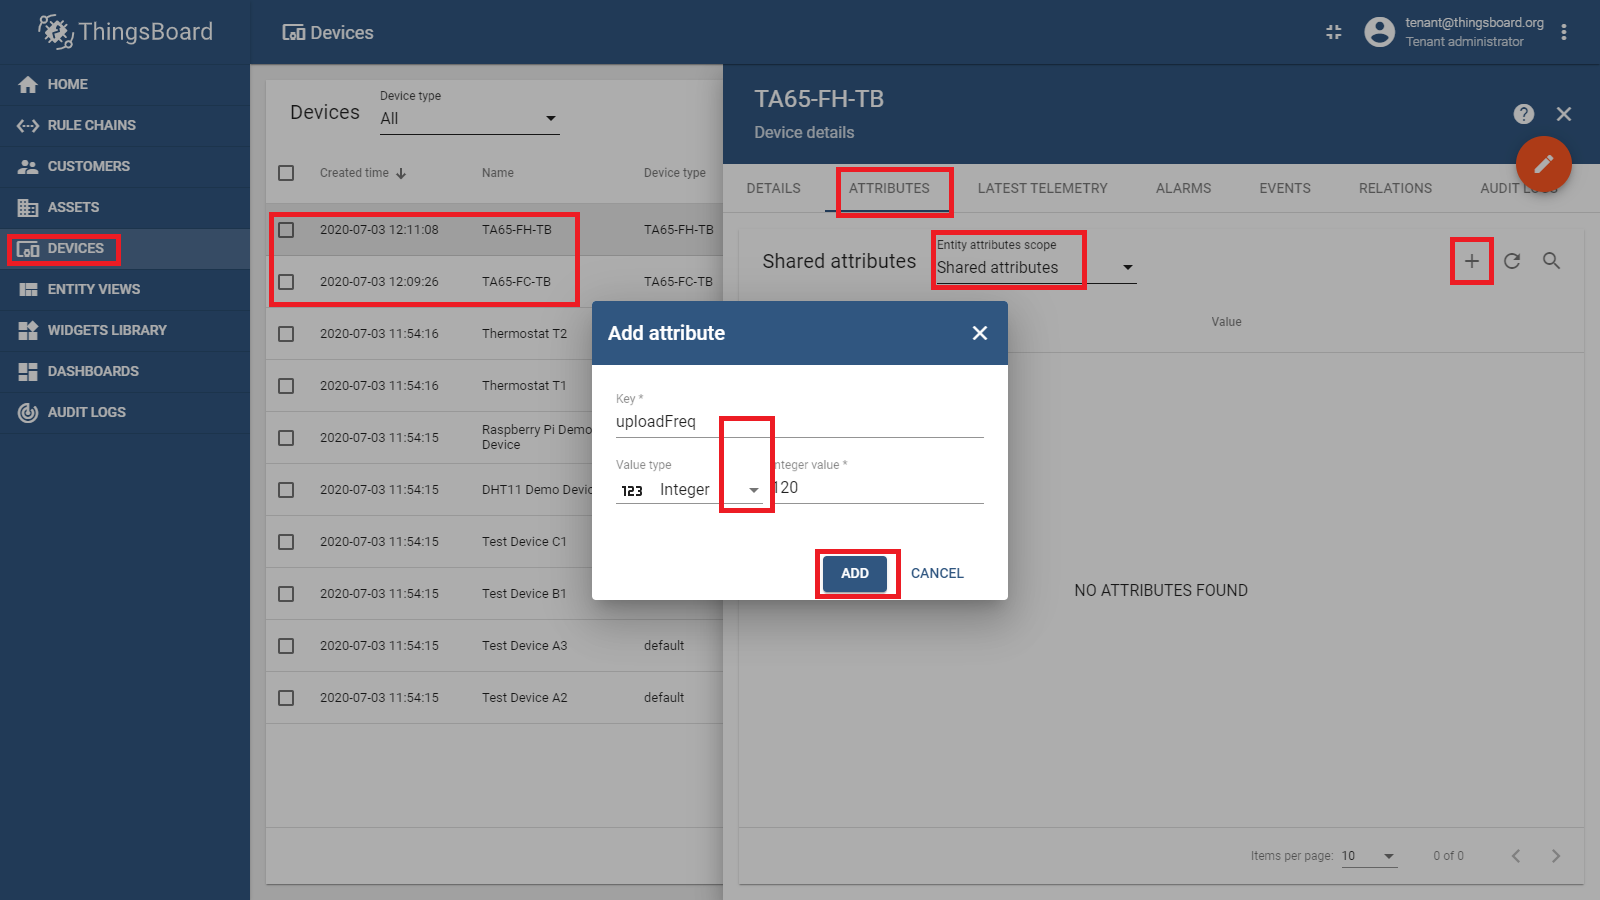

The following Shared attributes of the two devices, TA65-FC-TB and TA65-FH-TB, are identical.
| Key* | Value Type* | Value* | Memo |
|---|---|---|---|
| cloudHost | String | mqtt://
THINGSBOARD_IP
|
Please replace THINGSBOARD_IP
with your value.
This ThingsBoard Server’s MQTT URL,
It must begin with “MQTT ://”, such as
mqtt://192.168.21.222
|
| uploadFreq | Integer | 120 | Telemetry per uploadFreq seconds |
| syncTimeFreq | Integer | 1800 | Sync time per syncTimeFreq seconds |
| timezone | Integer | 480 | Please replace with your value.
The time offset from UTC, minutes.
For example Hongkong is UTC+8:00 time
zone, this offset is 480 minutes (8*60)
|
| timeNTPServer | String | pool.ntp.org | SNTP Server URL, eg: pool.ntp.org,
0.pool.ntp.org, 1.pool.ntp.org,
time.nist.gov, …
|
Note
The field with * must be filled in.
Step 5. Add asset
Note: You can skip this step if your asset already in ThingsBoard.
Assets –> + –> Add new asset –> Popup dialog –> Input name & asset type –> Add.

| Type | Assets |
|---|---|
| Name* | Building X |
| Asset type* | building |
| Label | |
| Description |
Note
The field with * must be filled in.
Step 6. Add device to asset
Add two devices to the Building X: Assets –> Building X –> Relations –> Direction: From –> + –> Popup dialog –> Input relation type, to entity type & entity list –> Add.


| Direction* | Relation Type* | To entityType* | Device* |
|---|---|---|---|
| From | Contains | Device | TA65-FC-TB |
| From | Contains | Device | TA65-FH-TB |
Note
The field with * must be filled in.
Step 7. Import Avantec Widgets
Tip
Avantec_widgets.json can only be imported once. If you have already imported it, you do not need and cannot repeat the import.
If you have already imported it, you can skip this step.
Widgets Library –> + –> Popup dialog –> Select File: avantec_widgets.json –> Import.
See avantec_widgets.json.


Step 8. Avantec Dashboard
Step 8.1. Import Avantec Dashboard (Option)
Tip
Avantec_dashboard.json can only be imported once. If you have already imported it, you do not need and cannot repeat the import.
If you have already imported it, you can skip this step.
Dashboards –> + –> Popup dialog: Import dashboard –> Select File: avantec_dashboard.json –> Import –> Popup dialog: Configure aliases used by imported dashboard –> Edit alias(icon) –> Popup dialog: Edit alias –> Input Fileds : … –> Save.


| Field | Value |
|---|---|
| Alias name*: | Thermostats |
| Resolve as multiple entities* | TRUE |
| Filter type* | Device search query |
| Type* | Asset |
| Asset* | Building X |
| Relation type* | Contains |
| Device types* | TA65-FC-TB, TA65-FH-TB |
Step 8.2. Edit Avantec Dashboard
Tip
Avantec_dashboard.json can only be imported once. If you have already imported it, you do not need and cannot repeat the import.
If you have already imported avantec_dashboard.json, you may skip this step.
We can modify it, for example we can modify alias to add a new device.
Dashboards –> Open dashboard(icon) –> New Dashboard: Avantec Dashboard –> Edit (red icon on the bottom and right) –> Edit Dashboard Mode –> Entity aliases(icon on the top and right) –> Popup dialog: Entity aliases –> Edit alias(icon) –> Popup dialog: Edit alias –> Modify Fileds : … –> Save.


Step 9. Open Avantec Dashboard
Dashboards –> Open dashboard(icon) in the line of Avantec Dashboard –> New Dashboard: Avantec Dashboard –> Click this line of TA65-FC-TB.

