ChirpStack v3
Quick start Amazon AWS
Refer to Quickstart Debian or Ubuntu.
This section describes the steps needed to setup the ChirpStack stack including all requirements on a single machine. It has been tested on the following distributions (but with non or minimal modifications it will work on other versions too):
Ubuntu 20.04 LTS
Please refer to the other install pages for more generic installation instructions.
Assumptions
Many configurations of these packages are possible. Dependent software packages could be installed on any number of remote servers, and the packages themselves could be on their own servers. However, in order to simplify the initial installation, we will assume the following deployment architecture:
All ChirpStack components and their dependencies will be installed on a single server instance.
The ChirpStack Gateway Bridge component will be installed on the server, but can also be installed on the gateway itself.
No firewall rules are setup.
Of course, optimizations may need to be made depending on the performance of your systems. You may opt to move the PostgreSQL database to another server. Or you may decide to put your MQTT broker on a different system, or even use a different server than the one recommended in this document. These and other installation changes are beyond the scope of this document. However, you should be able to find the information here that would make these changes relatively straight-forward.
Prerequisites
Launch an Amazon EC2 instance:
Item
Description
Software Image (AMI)
Ubuntu Server 20.04 LTS (HVM), SSD Volume Type,
64-bit (x86)Virtual server type (instance type)
t3.micro,
Family: t3, 2 vCPU, 1 GiB Memory, Current generation: trueFirewall (security group)
ssh;
https;
8080, tcp, http;
1700, udp, LoRaWAN uplinkConfigure storage
1 x 8 GiB, Volume type: gp2, Root volume (Not encrypted)
Allocate Elastic IP address.
Associate Elastic IP address with the EC2 instance.
Install dependencies
MQTT broker - A publish/subscribe protocol that allows users to publish information under topics that others can subscribe to. A popular implementation of the MQTT protocol is Mosquitto.
Redis - An in-memory database used to store relatively transient data.
PostgreSQL - The long-term storage database used by the open source packages.
Use the package manager apt to install these dependencies:
sudo apt update
sudo apt install mosquitto mosquitto-clients redis-server redis-tools postgresql
Setup PostgreSQL databases and users
To enter the command line utility for PostgreSQL:
sudo -u postgres psql
Inside this prompt, execute the following queries to set up the databases that are used by the ChirpStack stack components. It is recommended to change the usernames and passwords. Just remember to use these other values when updating the chirpstack-network-server.toml and chirpstack-application-server.toml configuration files. Since these two applications both use the same table to track database upgrades, they must have separate databases.
-- set up the users and the passwords
-- (note that it is important to use single quotes and a semicolon at the end!)
create role chirpstack_as with login password 'dbpassword';
create role chirpstack_ns with login password 'dbpassword';

-- create the database for the servers
create database chirpstack_as with owner chirpstack_as;
create database chirpstack_ns with owner chirpstack_ns;

-- change to the ChirpStack Application Server database
\c chirpstack_as

-- enable the pq_trgm and hstore extensions
-- (this is needed to facilitate the search feature)
create extension pg_trgm;
-- (this is needed to store additional k/v meta-data)
create extension hstore;

-- exit psql
\q
Setup ChirpStack software repository
ChirpStack provides a repository that is compatible with the Ubuntu apt package system. First make sure that both dirmngr and apt-transport-https are installed:
sudo apt install apt-transport-https dirmngr
Set up the key for this new repository:
sudo apt-key adv --keyserver keyserver.ubuntu.com --recv-keys 1CE2AFD36DBCCA00
Add the repository to the repository list by creating a new file:
sudo echo "deb https://artifacts.chirpstack.io/packages/3.x/deb stable main" | sudo tee /etc/apt/sources.list.d/chirpstack.list
Update the apt package cache:
sudo apt update
Install ChirpStack Gateway Bridge
Note: If you intend to run the ChirpStack Gateway Bridge only on gateway(s) themselves, you can skip this step.
Install the package using apt:
sudo apt install chirpstack-gateway-bridge
log output:
----------------------------------------------------------
The configuration file is located at:
/etc/chirpstack-gateway-bridge/chirpstack-gateway-bridge.toml

Some helpful commands for chirpstack-gateway-bridge:
Start:
$ sudo systemctl start chirpstack-gateway-bridge

Restart:
$ sudo systemctl restart chirpstack-gateway-bridge

Stop:
$ sudo systemctl stop chirpstack-gateway-bridge

Display logs:
$ sudo journalctl -f -n 100 -u chirpstack-gateway-bridge
----------------------------------------------------------
The configuration file is located at /etc/chirpstack-gateway-bridge/chirpstack-gateway-bridge.toml. The default configuration is sufficient for this guide.
Start the ChirpStack Gateway Bridge service:
# start chirpstack-gateway-bridge
sudo systemctl start chirpstack-gateway-bridge

# start chirpstack-gateway-bridge on boot
sudo systemctl enable chirpstack-gateway-bridge
Install ChirpStack Network Server
Install the package using apt:
sudo apt install chirpstack-network-server
log output:
-----------------------------------------------------
The configuration file is located at:
/etc/chirpstack-network-server/chirpstack-network-server.toml

Some helpful commands for chirpstack-network-server:
Start:
$ sudo systemctl start chirpstack-network-server

Restart:
$ sudo systemctl restart chirpstack-network-server

Stop:
$ sudo systemctl stop chirpstack-network-server

Display logs:
$ sudo journalctl -f -n 100 -u chirpstack-network-server
-------------------------------------------------------
The configuration file is located at /etc/chirpstack-network-server/chirpstack-network-server.toml and must be updated to match the database and band configuration. See below two examples for the EU868 and US915 band. For more information about all the ChirpStack Network Server configuration options, see here or ChirpStack Network Server configuration.
After updating the configuration, you need to restart the ChirpStack Network Server and validate that there are no errors.
Start the ChirpStack Network Server service:
# start chirpstack-network-server
sudo systemctl start chirpstack-network-server

# start chirpstack-network-server on boot
sudo systemctl enable chirpstack-network-server
Print the ChirpStack Network Server log-output:
sudo journalctl -f -n 100 -u chirpstack-network-server
EU868 configuration example
[general]
log_level=4

[postgresql]
dsn="postgres://chirpstack_ns:dbpassword@localhost/chirpstack_ns?sslmode=disable"

[network_server]
net_id="000000"

  [network_server.band]
  # name="EU_863_870"
  name="EU868"

  [[network_server.network_settings.extra_channels]]
  frequency=867100000
  min_dr=0
  max_dr=5

  [[network_server.network_settings.extra_channels]]
  frequency=867300000
  min_dr=0
  max_dr=5

  [[network_server.network_settings.extra_channels]]
  frequency=867500000
  min_dr=0
  max_dr=5

  [[network_server.network_settings.extra_channels]]
  frequency=867700000
  min_dr=0
  max_dr=5

  [[network_server.network_settings.extra_channels]]
  frequency=867900000
  min_dr=0
  max_dr=5
US915 configuration example sub-band 1 (125kHz channels 0 - 7 & 500kHz channel 64)
[general]
log_level=4

[postgresql]
dsn="postgres://chirpstack_ns:dbpassword@localhost/chirpstack_ns?sslmode=disable"

[network_server]
net_id="000000"

[network_server.band]
# name="US_902_928"
name="US915"

[network_server.network_settings]
enabled_uplink_channels=[0, 1, 2, 3, 4, 5, 6, 7, 64]
US915 configuration example sub-band 2 (125kHz channels 8 - 15 & 500kHz channel 65)
This is the same channel-plan as used by The Things Network.
[general]
log_level=4

[postgresql]
dsn="postgres://chirpstack_ns:dbpassword@localhost/chirpstack_ns?sslmode=disable"

[network_server]
net_id="000000"

[network_server.band]
# name="US_902_928"
name="US915"

[network_server.network_settings]
enabled_uplink_channels=[8, 9, 10, 11, 12, 13, 14, 15, 65]
Install ChirpStack Application Server
Install the package using apt:
sudo apt install chirpstack-application-server
log output:
-------------------------------------------------------
The configuration file is located at:
/etc/chirpstack-application-server/chirpstack-application-server.toml

Some helpful commands for chirpstack-application-server:
Start:
$ sudo systemctl start chirpstack-application-server

Restart:
$ sudo systemctl restart chirpstack-application-server

Stop:
$ sudo systemctl stop chirpstack-application-server

Display logs:
$ sudo journalctl -f -n 100 -u chirpstack-application-server
-------------------------------------------------------
The configuration file is located at /etc/chirpstack-application-server/chirpstack-application-server.toml and must be updated to match the database configuration. See below a configuration example which matches the database which we have created in one of the previous steps. For more information about the ChirpStack Application Server configuration options, see ChirpStack Application Server configuration.
[general]
log_level=4

[postgresql]
dsn="postgres://chirpstack_as:dbpassword@localhost/chirpstack_as?sslmode=disable"

  [application_server.external_api]
  jwt_secret="M9LoHX3wPQlcB2ziakV6qs/F2vLOvkAtrRv1yTu5Kks="
Note: you must replace the jwt_secret with a secure secret! You could use the command openssl rand -base64 32 to generate a random secret.
Start the ChirpStack Application Server service:
# start chirpstack-application-server
sudo systemctl start chirpstack-application-server

# start chirpstack-application-server on boot
sudo systemctl enable chirpstack-application-server
Print the ChirpStack Application Server log-output:
sudo journalctl -f -n 100 -u chirpstack-application-server
Connecting a gateway
Login into the ChirpStack Application Server web-interface. The default credentials are:
Username: admin
Password: admin
Optional: Adding a Network Server
Refer to Network servers.
ChirpStack Application Server is able to connect to one or multiple ChirpStack Network Server instances. Global admin users are able to add new Network Servers to the ChirpStack Application Server installation.
Note: once a Network Server is assigned to a Service Profile or Device Profile, a Network Server can’t be removed before deleting these entities, it will return an error.
When creating a new Network Server, ChirpStack Application Server will create a Routing Profile on the given Network Server, containing the hostname:ip of the ChirpStack Application Server installation. In case your ChirpStack Application Server installation is not reachable on localhost, make sure this hostname:ip is configured correctly in your ChirpStack Application Server Configuration. This Routing Profile is updated on Network Server updates and deleted on Network Server deletes.
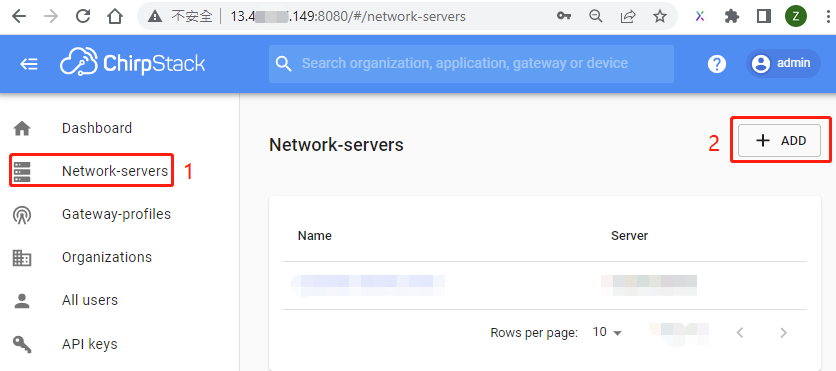
Go to Network-servers –> +Add.
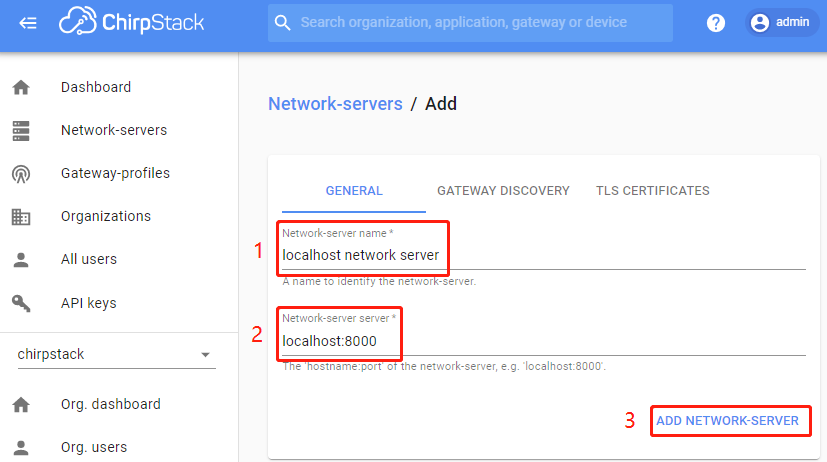
Type some parameters –> ADD NETWORK-SERVER.
Item
Description
Network-server name
localhost network server
Network-server server
llocalhost:8000
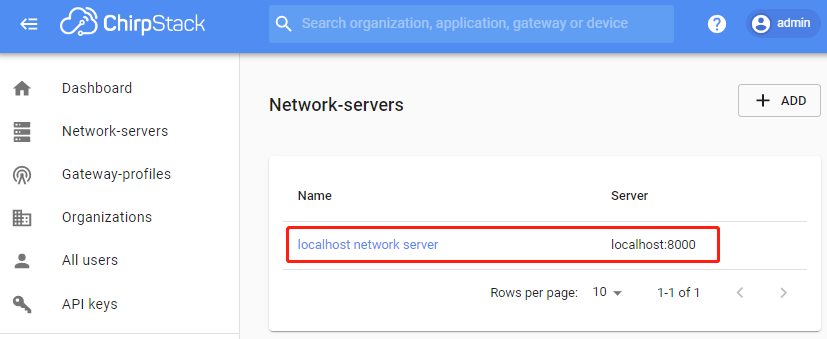
Show Network servers.
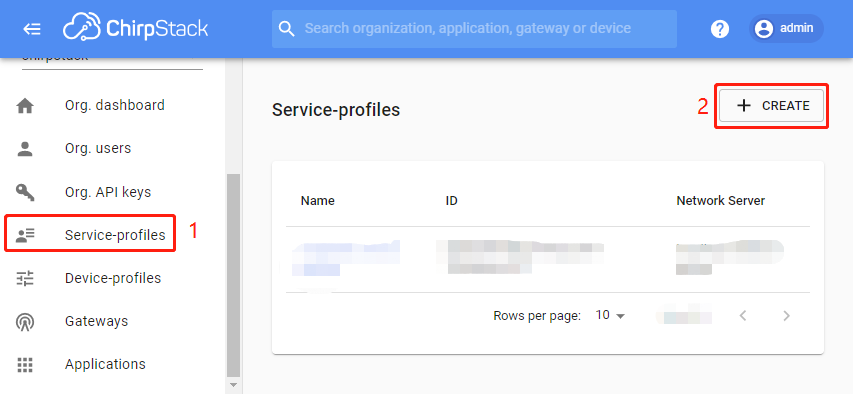
Optional: Creating a Service-profile
Refer to Service profiles.
The Service Profile can be seen as the “contract” between an user and the network. It describes the features that are enabled for the user(s) of the Service Profile and the rate of messages that can be sent over the network.
When creating a Service Profile, ChirpStack Application Server will create the actual profile on the selected Network Server, and will keep a reference record so it knows to which organization it belongs.
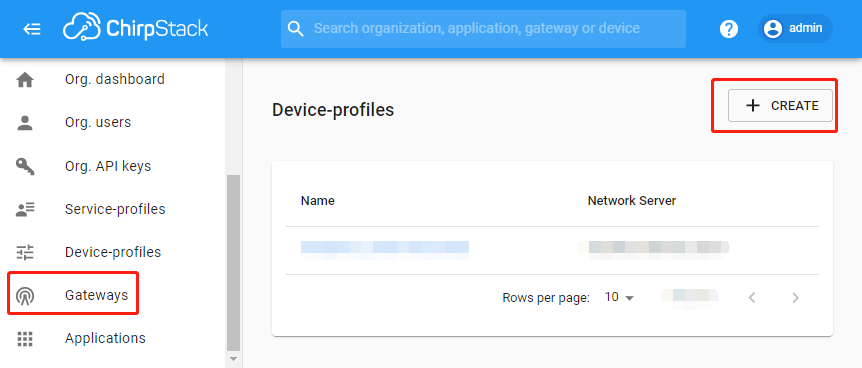
Go to Service-profiles –> +Create.
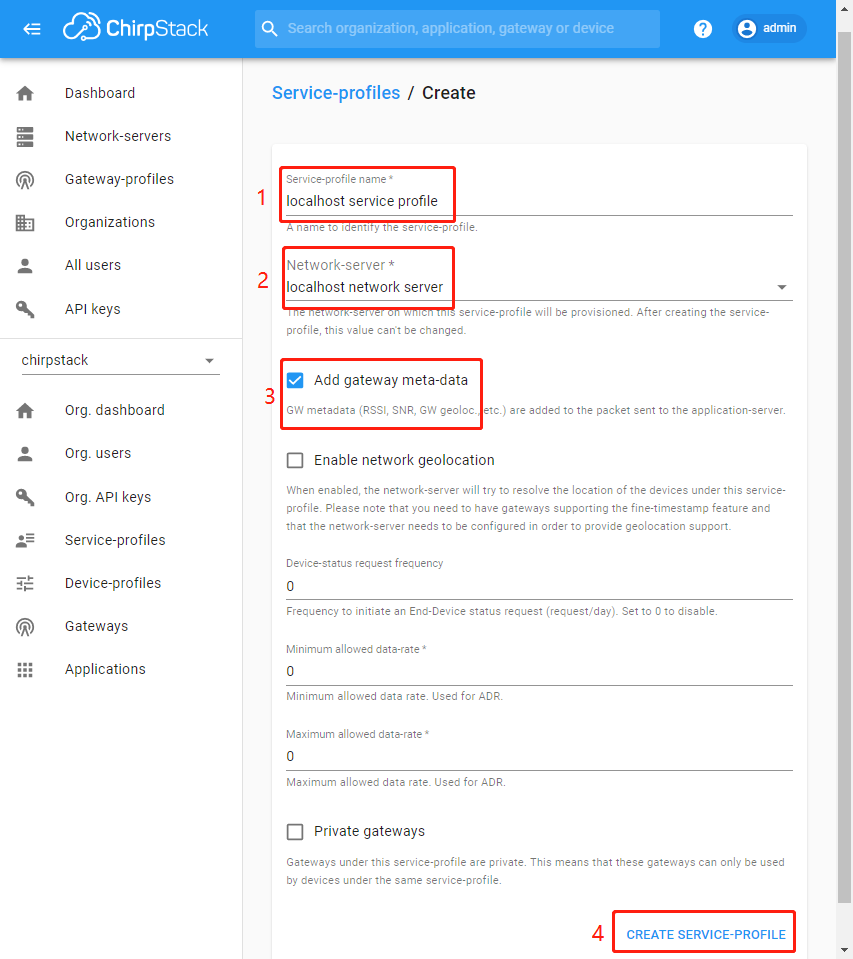
Type some parameters –> CREATE SERVICE-PROFILE
Item
Description
Service-profile name
localhost service profile
Network-server name
localhost network server
Add gateway meta-data
Enable
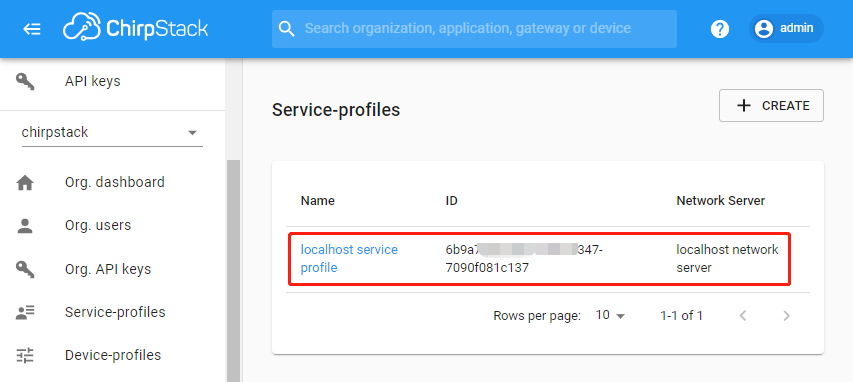
Show Service profiles.
Adding a gateway
Refer to Connecting gateway.
This guide describes how to connect your gateway to ChirpStack and how to validate that it is successfully communicating with the ChirpStack Network Server. At this point it is expected that you have the ChirpStack Application Server and ChirpStack Network Server components up and running.
Requirements
Before continuing, please make sure that you have installed both a packet-forwarder and the ChirpStack Gateway Bridge. The packet-forwarder that is installed on your gateway and the steps needed to install the ChirpStack Gateway Bridge vary per gateway vendor and model. In some cases you must also install the ChirpStack Gateway Bridge on the gateway. Please refer to the ChirpStack Gateway Bridge Gateway installation documentation, which contains instructions for various gateway models.
Packet-forwarders
There are different packet-forwarder implementations. The packet-forwarder that is installed on your gateway depends on the gateway vendor and model. The packet-forwarders that are compatible with ChirpStack:
Configuration
Packet-forwarder
The packet-forwarder that is configured on your gateway must forward its data to the ChirpStack Gateway Bridge. As it controls the LoRa® chipset of the gateway, it also must be configured for the correct frequencies. A mismatch in frequencies means that the gateway will not receive uplinks sent by a device and / or is unable to send downlink payloads when the downlink frequency is outside the configured frequency range. Usually gateway vendors provide configuration examples for various bands. Please validate that the configuration matches the band and channels in the ChirpStack Network Server Configuration.
Add gateway
Tip
If you have not yet connected your ChirpStack Application Server instance with a ChirpStack Network Server instance, you must do this first. See Optional: Adding a Network Server. Also you must connect the organization with the network-server by Optional: Creating a Service-profile.
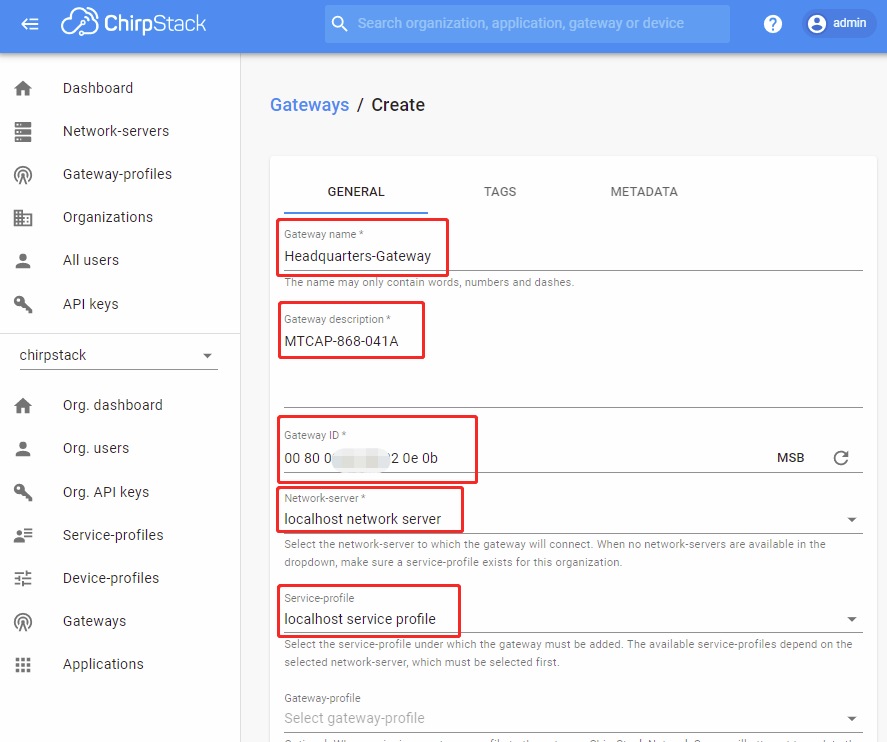
Go to Gateways in the web-interface, and click +Create.
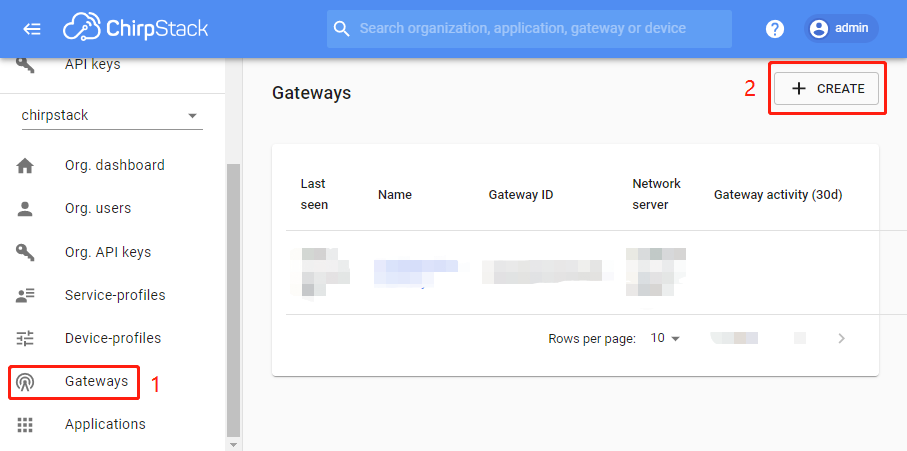
Complete the form. Make sure that the Gateway ID field is equal to the Gateway ID of your gateway. If this value is incorrectly configured, data received by your gateway will be rejected. Then click Create Gateway.
Item
Description
Name
Headquarters-Gateway
Description
MTCAP-868-041A<
Gateway ID (EUI64)
YOUR_GATEWAY_ID, eg:0080000000020e0b
Network-server name
localhost network server
Service-profile name
localhost service profile
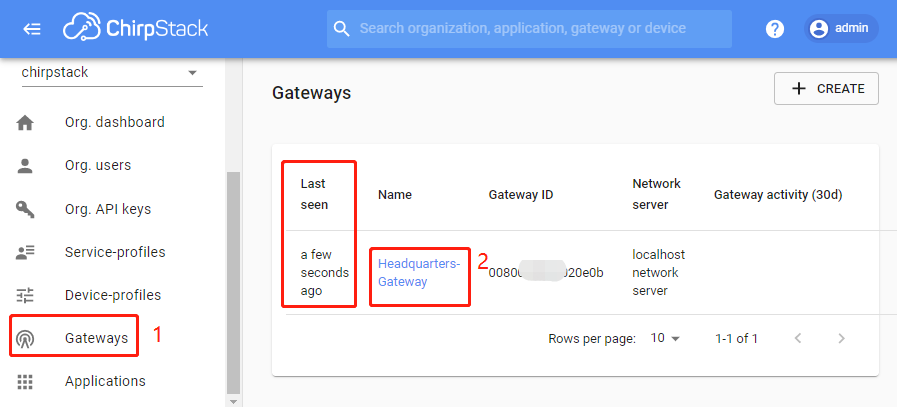
Show Gateways.
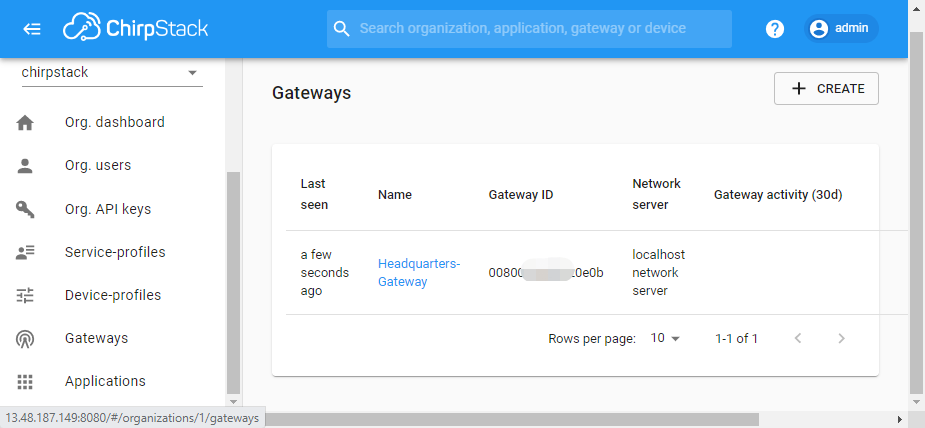
Validate
There are a few ways to validate if your gateway is correctly configured.
Last seen at
Event when no LoRa(WAN) data is received by the gateway, it will send gateway statistics periodically. Usually this stats interval is configured to 30 seconds. As ChirpStack Application Server will update the gateway Last seen at timestamp when it receives statistics, this is the easiest way to validate that the gateway is correctly configured.
Note: it might take a short while before statistics are sent by your gateway. You must refresh the page in order to see the (new) Last seen at value.
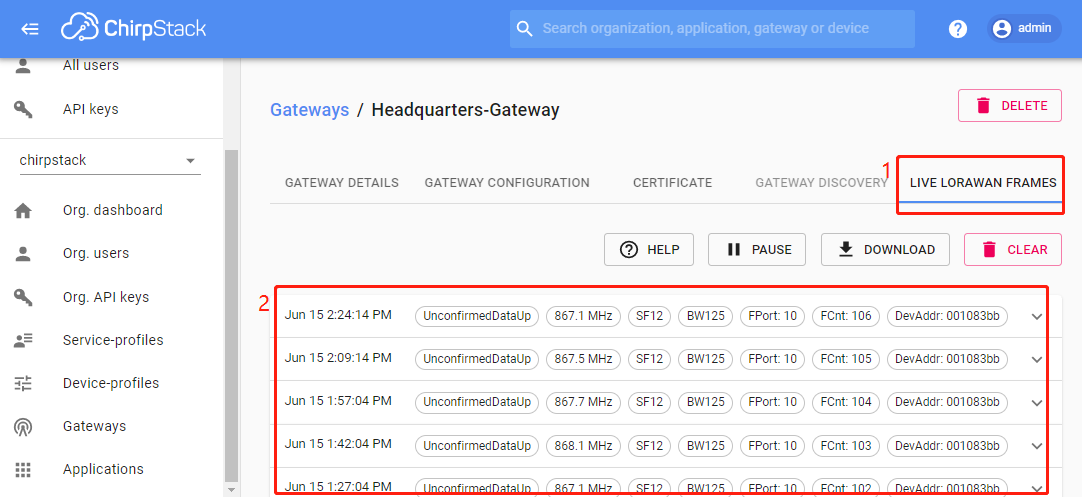
LoRaWAN frames
After opening the overview page of your gateway, you will see a LoRaWAN frames tab. This will show all LoRaWAN frames that are received and sent by your gateway. In case of received frames, this means that you will also see received frames from devices that are not yours and / or that are not yet configured. Therefore this screen is useful to validate if your gateway is able to receive LoRaWAN frames and forward these to ChirpStack.
Troubleshooting
Connecting a device
Refer to Connecting device.
This guide describes how to connect your LoRaWAN device with ChirpStack and how to validate that it can successfully activate. At this point it is expected that you have the ChirpStack Network Server and ChirpStack Application Server components installed and that you have successfully connected a LoRa gateway to it.
Requirements
Before continuing, there are a couple things you need to know about your device. This information is usually provided by the device vendor.
DevEUI
LoRaWAN MAC version implemented by the device
Regional Parameters revision implemented by the device
OTAA: Device root-keys (when no external join-server is used)
Login
Login into the ChirpStack Application Server web-interface. The default credentials are:
Username: admin
Password: admin
Optional: Creating a Device profile
Before you can add the device to ChirpStack, you have to create a Device-profile if you haven’t done this already. In general it is a good practice to create separate device-profiles for different types of devices. A device-profile contains the capabilities of your device. For example if it uses ABP or OTAA for activation, which LoRaWAN version and Regional Parameters revision is implemented by the device, etc… It can also be configured with a function to decode the payloads sent by the devices using the device-profile.
Within the ChirpStack Application Server web-interface, click Gateways and then Create.
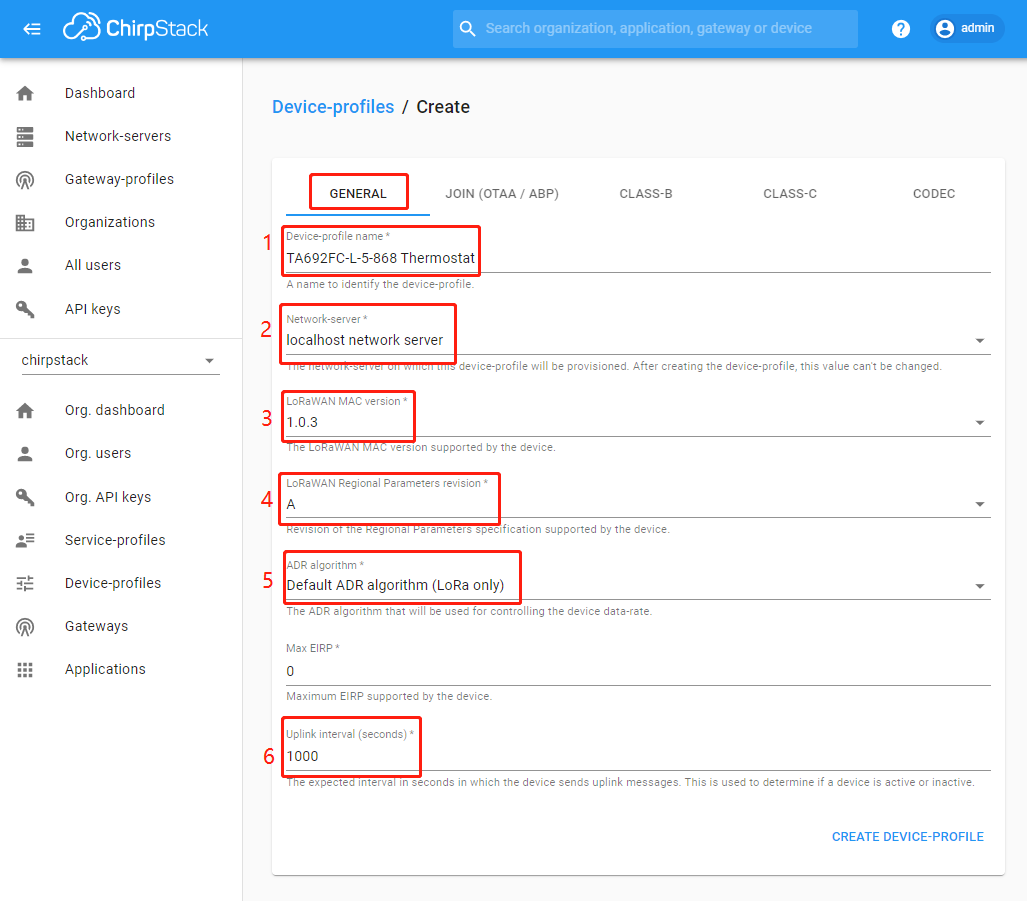
Under the General tab, fill in the required fields.
Item
Description
Name
TA692FC-L-5-868 Thermostat
Network-server
localhost network server
Region
EU868
LoRaWAN MAC version
LoRaWAN 1.0.3
LoRaWAN Regional parameters revision
A
ADR algorithm
Default ADR algorithm (LoRa only)
Uplink interval (seconds)
1000
Device-status request frequency (req/day)
1
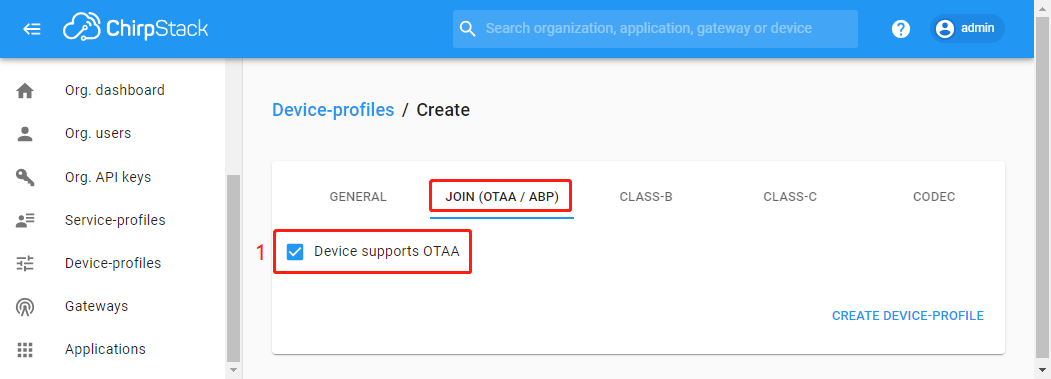
Under the Join (OTTA/ABP) tab, fill in the required fields.
Item
Description
Join (OTAA / ABP)
yes, Device supports OTAA
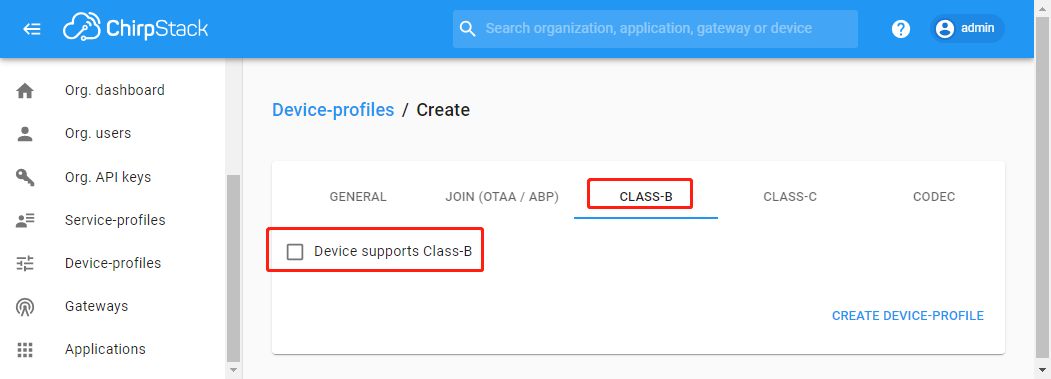
Under the Class-B tab, fill in the required fields.
Item
Description
Supports Class-B
no
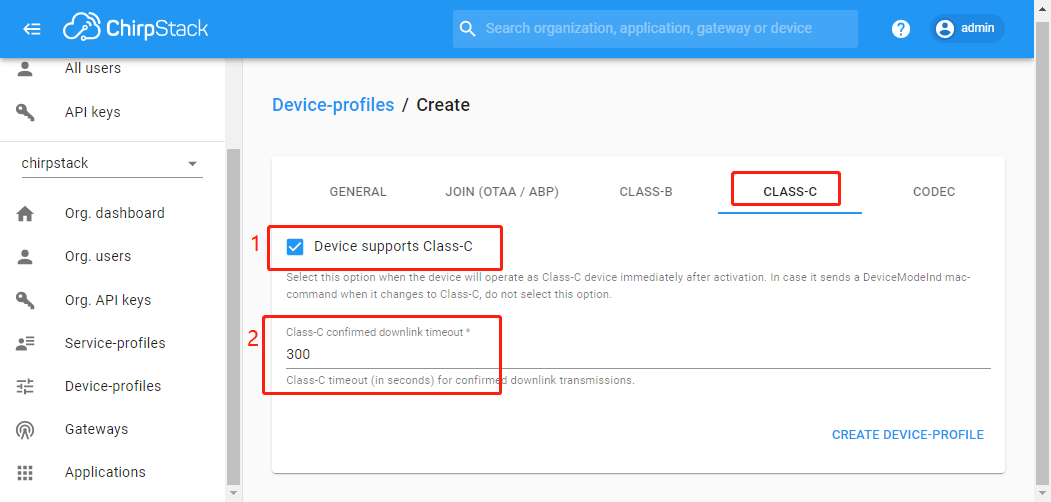
Under the Class-C tab, fill in the required fields.
Item
Description
Supports Class-C
yes
Class-C confirmed downlink timeout (seconds)
300
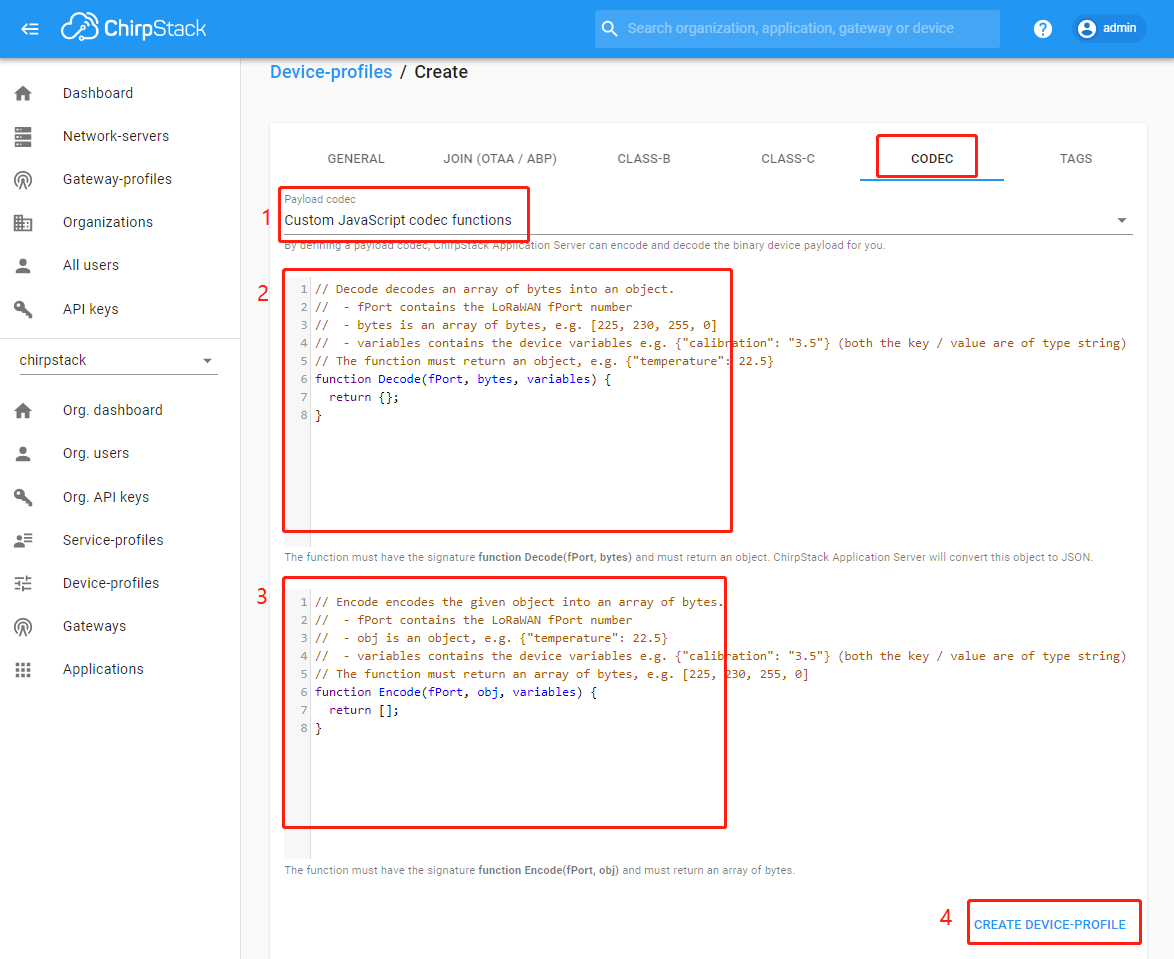
Under the Codec tab, fill in the required fields. Then click create device-profile.
Note: The data here may not be decoded. It’s here just for debugging convenience.
Item
Description
Payload codec
Custom JavaScript codec functions
// Decode decodes an array of bytes into an object.
//  - fPort contains the LoRaWAN fPort number
//  - bytes is an array of bytes, e.g. [225, 230, 255, 0]
//  - variables contains the device variables e.g. {"calibration": "3.5"} (both the key / value are of type string)
// The function must return an object, e.g. {"temperature": 22.5}
function Decode(fPort, bytes, variables) {
    var dataX = {};
    var fanModeStateMeta = {
    0: "OFF",
    1: "LOW",
    2: "MED",
    3: "HIGH",
    4: "AUTO"
    };
    var systemModeMeta = {
    0: "OFF",
    1: "COOL",
    2: "FAN-ONLY"
    };
    if(fPort==10){
    dataX.roomTemperature = ((bytes[0] << 8) + bytes[1])/10;
    dataX.setTemperature = ((bytes[2] << 8) + bytes[3])/10;
    dataX.coolProportionalOutput = bytes[4]/100;
    dataX.fanMode = fanModeStateMeta[bytes[5]];
    dataX.fanState = fanModeStateMeta[bytes[6]];
    dataX.threshold = bytes[7]/10;
    dataX.systemMode = systemModeMeta[bytes[8]];
    dataX.coolPBand = bytes[9]/10;
    dataX.coolItime = (bytes[10] << 8) + bytes[11];
    dataX.kFactor = bytes[12];
    return {
        data: {
        roomTemperature: dataX.roomTemperature,
        setTemperature: dataX.setTemperature,
        coolProportionalOutput: dataX.coolProportionalOutput,
        fanMode: dataX.fanMode,
        fanState: dataX.fanState,
        threshold: dataX.threshold,
        systemMode: dataX.systemMode,
        coolPBand: dataX.coolPBand,
        coolItime: dataX.coolItime,
        kFactor: dataX.kFactor
        }
    };
    }
}
// Encode encodes the given object into an array of bytes.
//  - fPort contains the LoRaWAN fPort number
//  - obj is an object, e.g. {"temperature": 22.5}
//  - variables contains the device variables e.g. {"calibration": "3.5"} (both the key / value are of type string)
// The function must return an array of bytes, e.g. [225, 230, 255, 0]
function Encode(fPort, obj, variables) {
return [];
}
Show Device profiles.

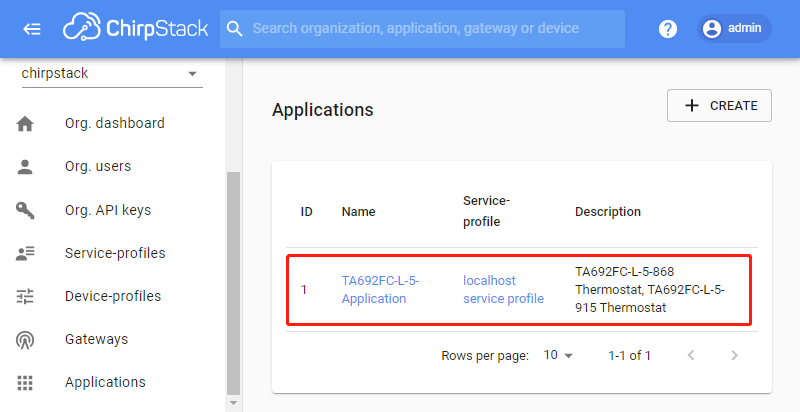
Optional: Adding an Application
Devices are grouped by applications. For example you could group your temperature sensors under one application and weather stations under an other application.
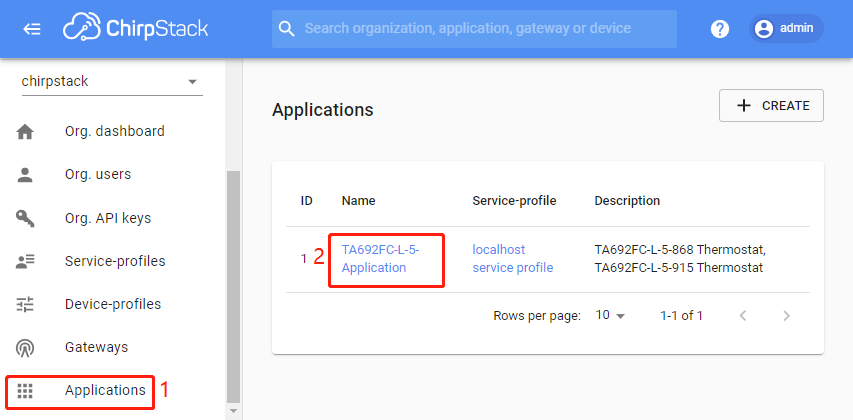
If you haven’t created an application yet to which you want to add the device, click Applications, then click Create.
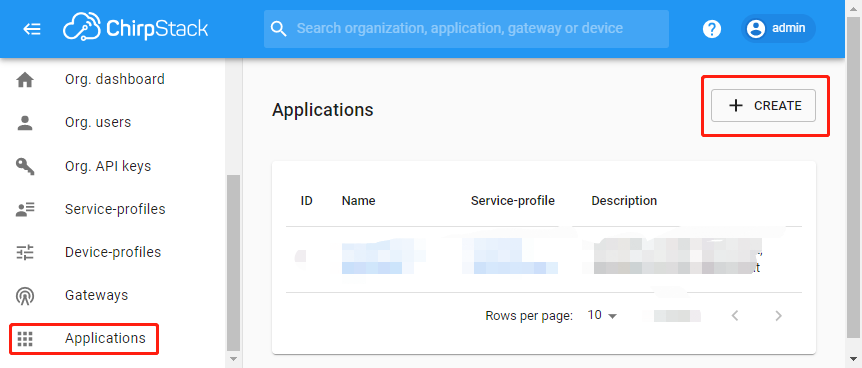
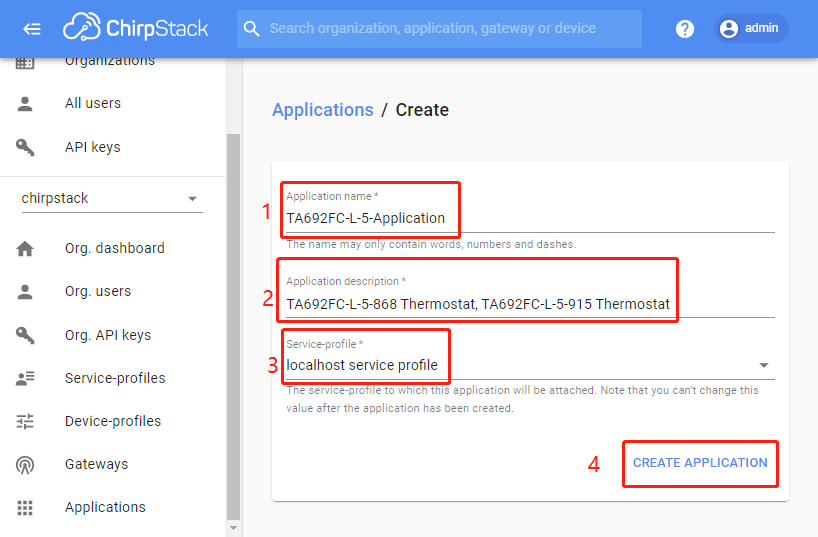
Fill in the required fields and Create Application.
Item
Description
Name
TA692FC-L-5-Application
Description
TA692FC-L-5-868 Thermostat, TA692FC-L-5-915 Thermostat
Service-profile name
localhost service profile
Show Applications.
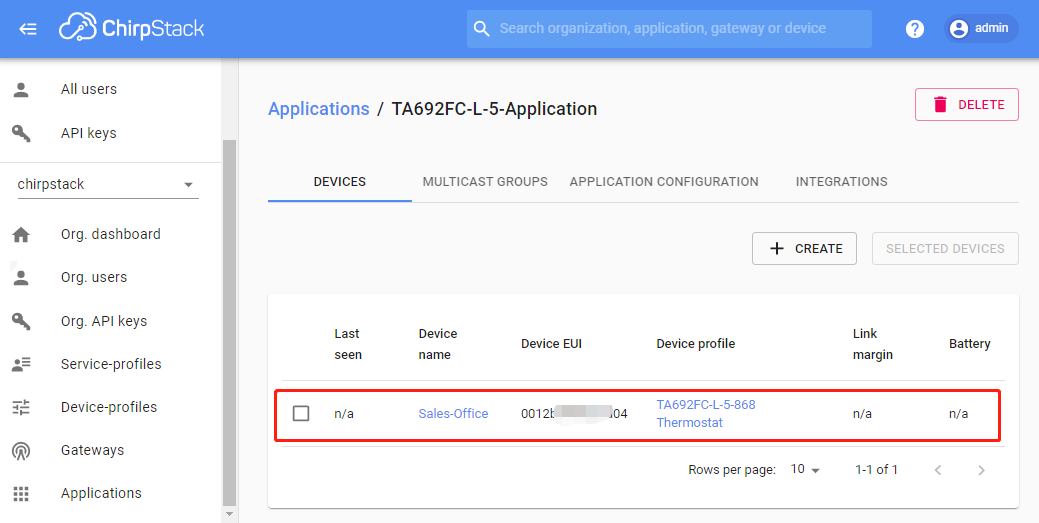
Creating a device
Click the (newly created) application to which you want to add your device.
Under the Devices tab, click Create.
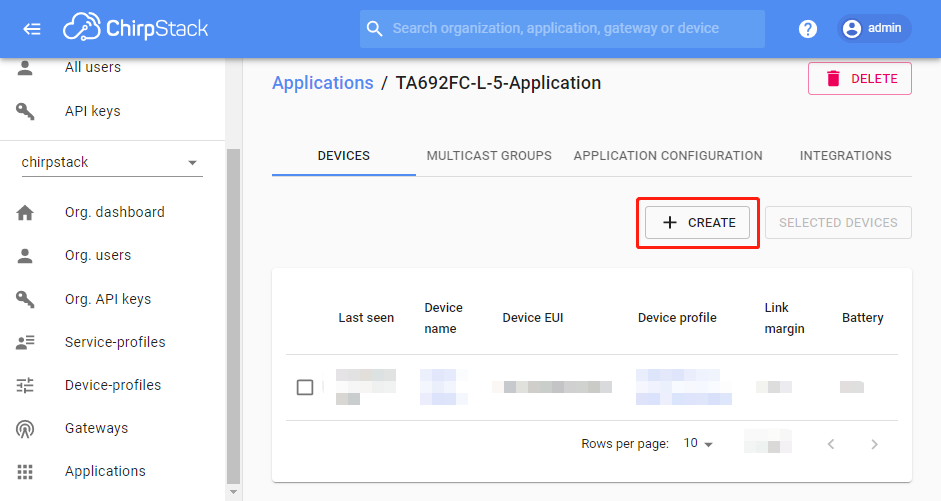
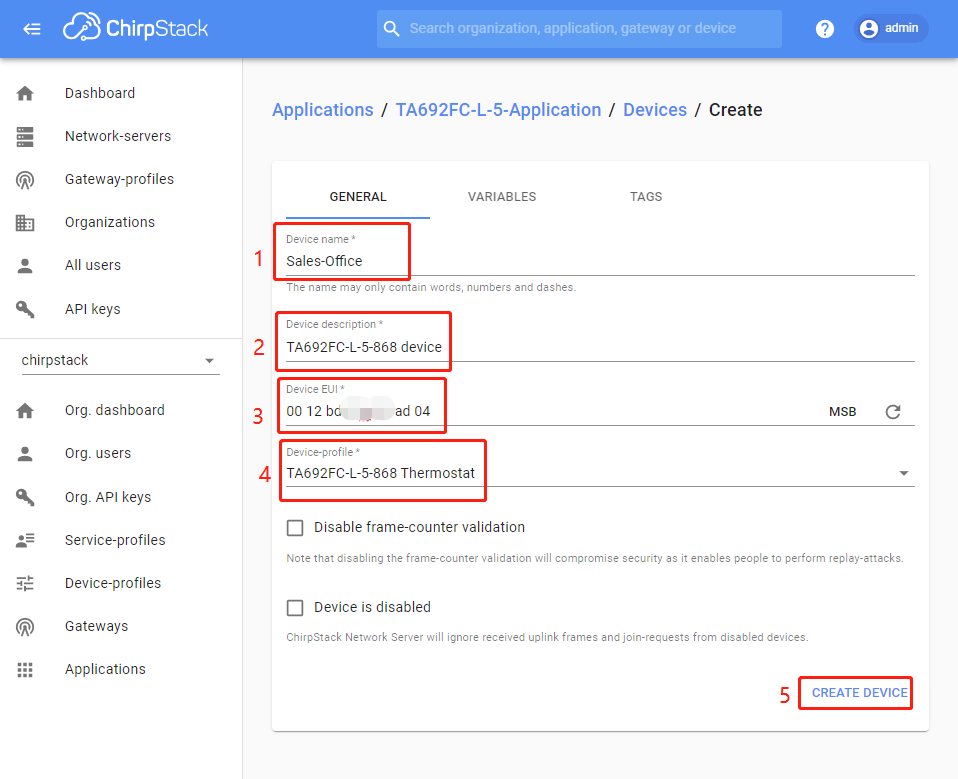
Fill in the required fields and select the device-profile that you want to associate with your device and save the device.
Item
Description
Name
Sales-Office
Description
TA692FC-L-5-868 device
Device EUI (EUI64)
YOUR_DEVICE_EUI, eg:0012bdfffe02ad04
Device profile
TA692FC-L-5-868 Thermostat
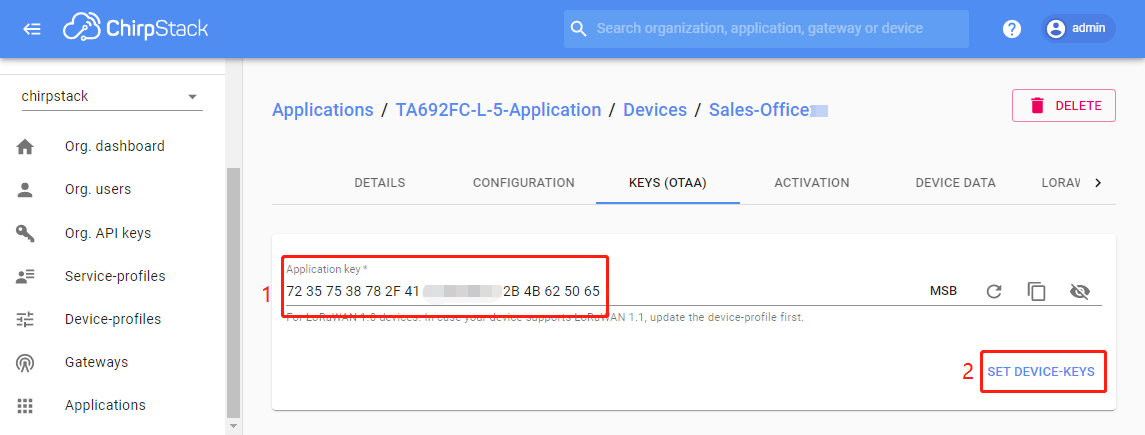
Depending the device-profile is configured for OTAA or ABP, the next page will ask you to enter the device root-keys (OTAA) or device session-keys (ABP).
In case your ChirpStack Network Server is configured with a join-server and your (OTAA) device will use this join-server for activation, then there is no need to enter the root-keys.
Item
Description
Application key
YOUR_DEVICE_EUI, eg:72357538782F413F4428472B4B625065
Show Devices.
Validate
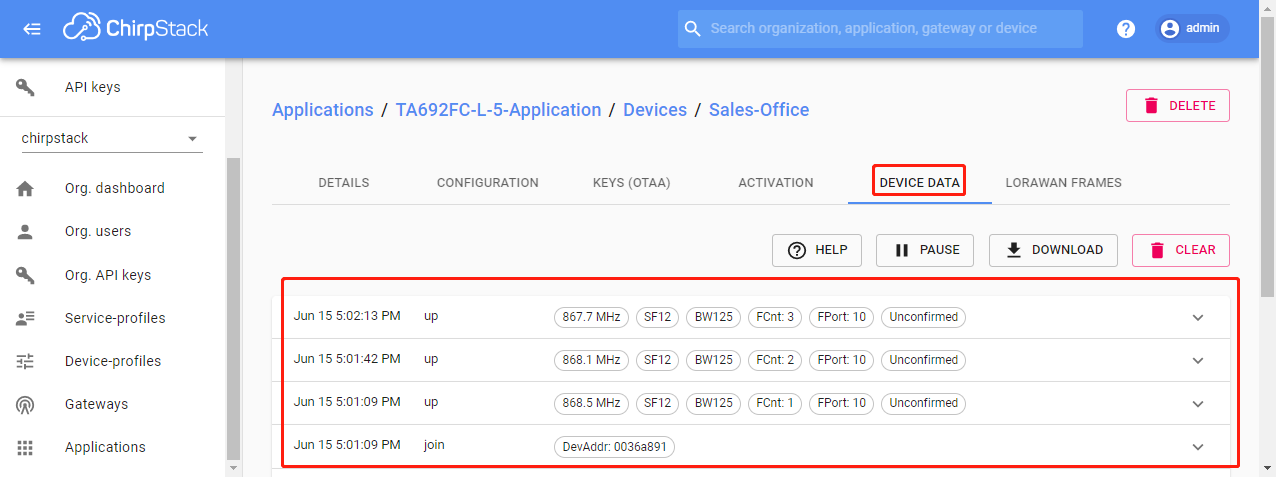
After adding your LoRaWAN device to ChirpStack, validate that your device is able activate (in case of OTAA) and send data. Clicking the device in the ChirpStack Application Server web-interface.

Open in one window the Device data and in an other window the LoRaWAN frames tab. Then turn on your device or trigger an uplink transmission. In case of an OTAA device you should first see a JoinRequest followed by a JoinAccept message in the LoRaWAN frames tab.
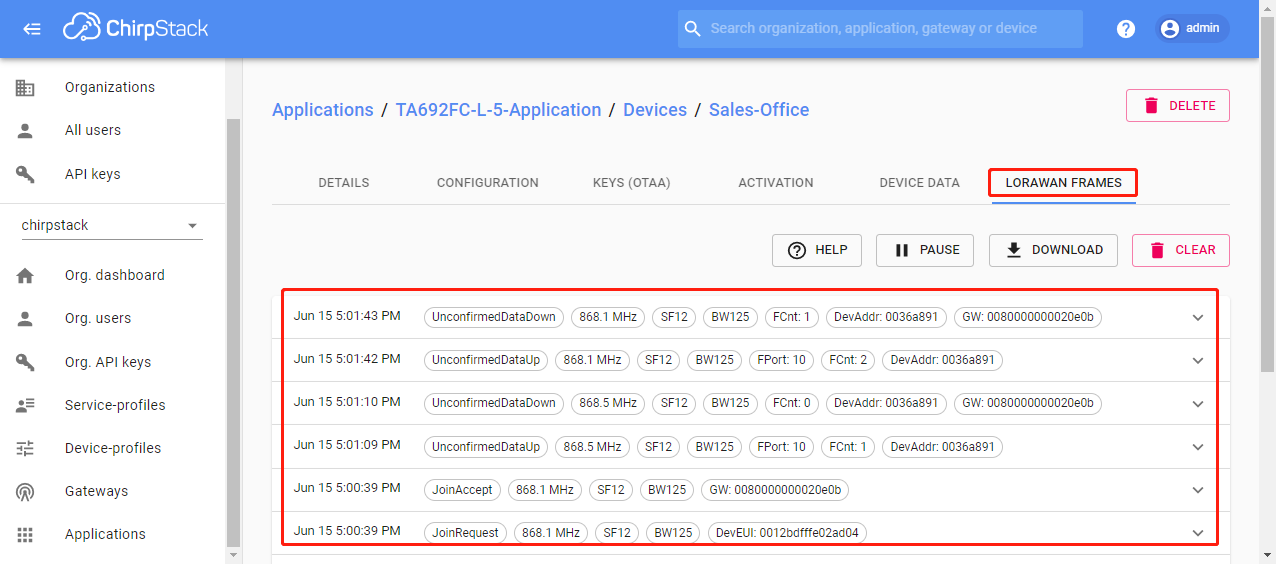
When the device sends its first data payload, you should also see a Join and Up event in the Device data tab.